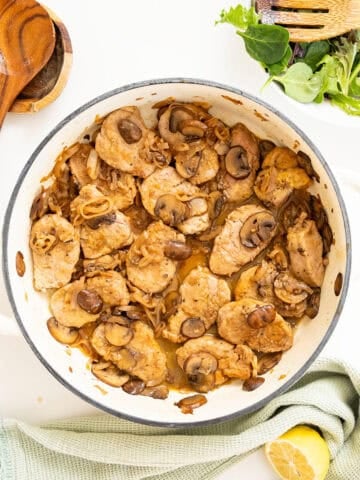
A full guide to learn how to stuff your own Homemade Italian Sausage, including grinding the meat and stuffing the casings. Make your own homemade sausage in bulk for the summer to add to your favorite dishes like Italian Sausage and Peppers or Restaurant-Style Chicken Scarpariello.

Making sausage, like any other hobby, takes time to learn. This guide will absolutely help you, but nothing teaches you better than grabbing the things you need and going for them. So, use this blog as a guide and go for it!
Why My Family Makes Homemade Italian Sausage Every Year
Stuffing homemade Italian sausage or any other sausage we make isn't just tasty, it's a family tradition. When we stuff sausages, we don't mess around here. Making homemade sausage is hard work, but so rewarding. If I'm going to break out the grinder and sausage stuffer, I'm making 10-20 pounds of sausage easily. I store it in my freezer, and it stays for 6 months!
For us, it's not just about making a bunch of sausage because with the amount of time it takes, you barely save any money. But it's our annual family tradition, and it brings us together for something every Summer. A family project. And the real difference between homemade and store-bought is that when you and your kids are eating homemade, you know that you made this sausage, right here in your kitchen. Of course, the flavor is delicious, but that's the obvious one!
How to Start Making Homemade Italian Sausage
The first thing to start with is having the things you need. Of course, back in the day, they used to stuff sausages by hand. But in the year 2026 of our Lord, we're just going to buy the tools that make this easy. If you're looking to stuff sausages by hand, I wish you luck.
Here are the tools I use when stuffing sausage:
These tools are great for beginners, especially if you already have a Kitchenaid Stand Mixer. You can just buy the attachments and try them out before heavily investing in the hobby. Of course, if you're looking to get more serious, there are other grinders and sausage stuffers that you can purchase, but those aren't what I would get into if I were just starting out.
Sausage Casings
If you're going to stuff sausages, you need something to stuff. Casings come in all different sizes and shapes. You've seen all different kinds of sausage, whether it be hot/sweet Italian, breakfast sausage, vegan sausage, or Italian sausage ring. All of these types of sausage will need different casings.
Hog Casings
Hog casings are probably the most common. Most sausages are made with pork, so it makes sense we'd stuff hog casings. The easy way to explain a casing is that it is a part of the animal's intestine. It's not the entire intestine, that would be crazy, obviously. It is just the submucosa. Alright, we're getting gross now. These are what I use when I'm making Hot and Sweet Italian Sausage.
Hog casings are pretty easy to work with because they have larger holes, anywhere from 30-45mm, but usually somewhere around 35-37mm. Casings come packed in salt to keep them fresh. You can repack them in noniodized salt and store them in the refrigerator.
Sheep Casings
Sheep Casings are a little less common and slightly more expensive. They are used for Italian ring sausage, breakfast sausage, and finger sausage. They are much thinner casings and also much longer because a sheep can have intestines twice as long as a hog! Sheep casings are typically 19-21mm wide but can vary from 19-30mm.
These casings can be slightly more difficult to work with because they are so much thinner than hog casings. They also provide less of a snap when you're eating your sausage, as the casing is much softer.
Vegetarian Casings
Vegetarian casings are made with vegetable glycerin and sugar/starches. I've never experimented with these, so I don't know much about them.
Artificial Casings
Hog and sheep casings are natural. Artificial casings are made from things like collagen and cellulose. Although these are the things that make up hog and sheep casings, artificial casings are those that are made or processed into sausage casings.
Ingredient Notes
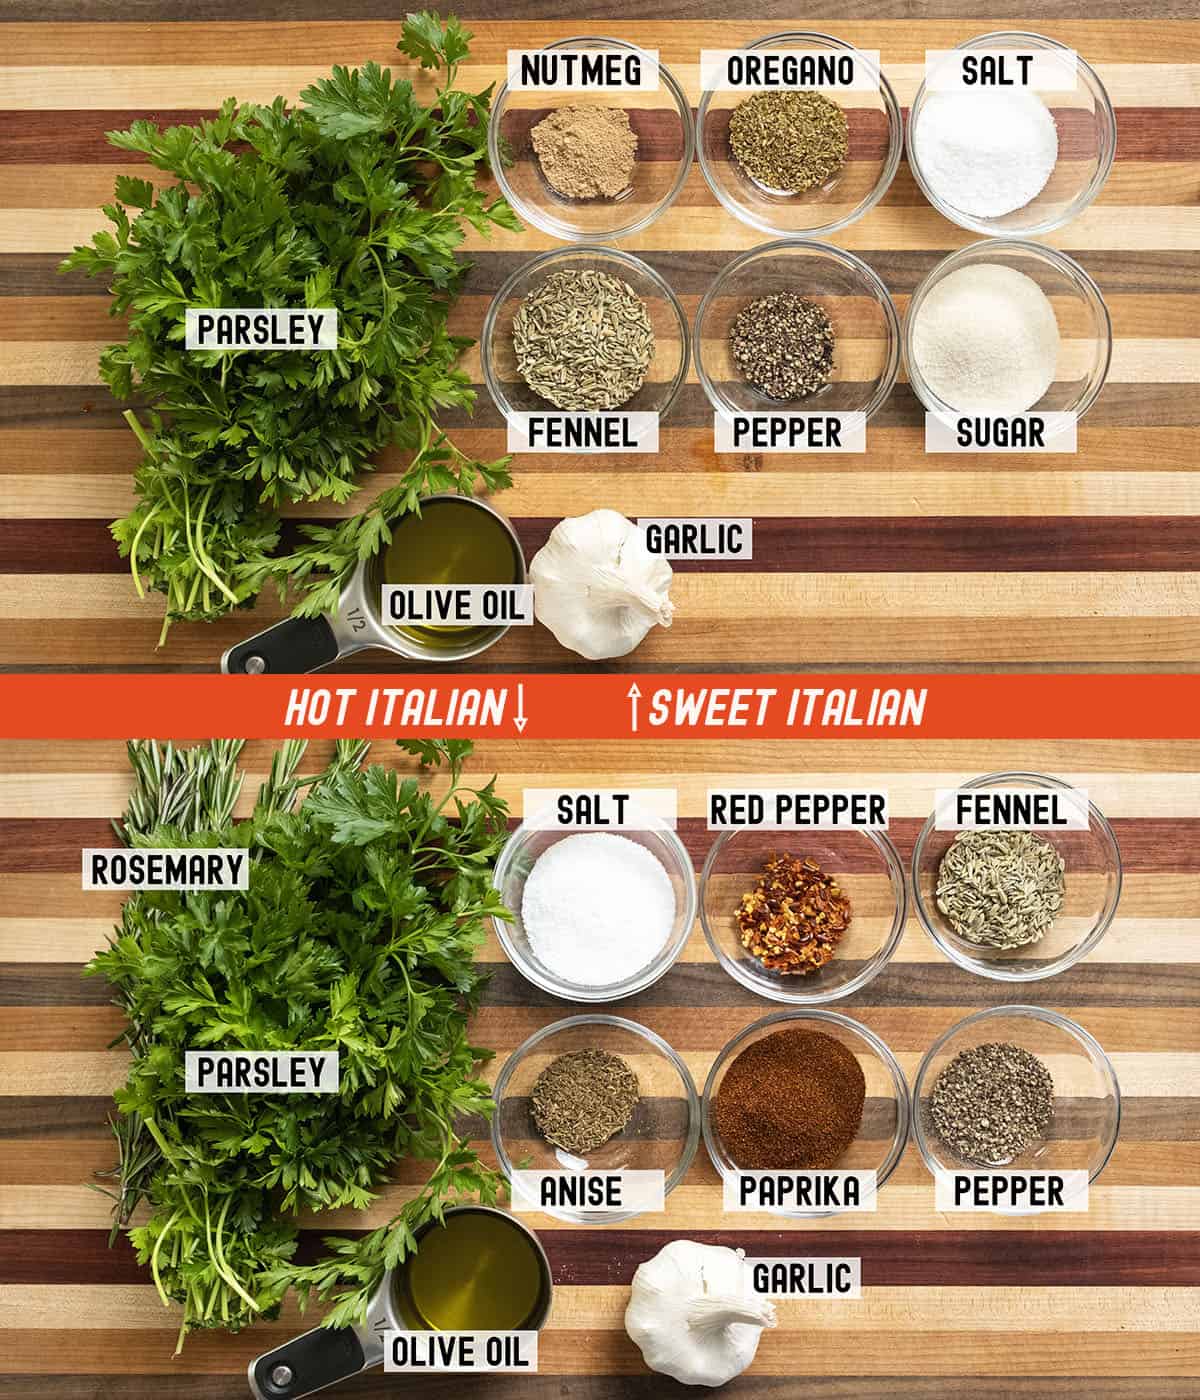
- Fennel: Fennel is the flavor that makes Italian sausage taste like Italian sausage. I use whole fennel seeds. They are the signature flavor for Italian sausage, and we use them in our Homemade Italian Sausage Seasoning.
- Hot Pepper: Adjust the cayenne and hot pepper to a spice level that you prefer. This is a medium spice for us.
- Fresh Herbs: Fresh herbs like parsley and rosemary are a must in homemade sausage. The flavor is fresh and light!
- Olive Oil: I always add olive oil to the sausage to help increase the fats and marinate it with the seasoning.
*Please see the recipe card below for more information on ingredients.
Best Pork for Homemade Italian Sausage
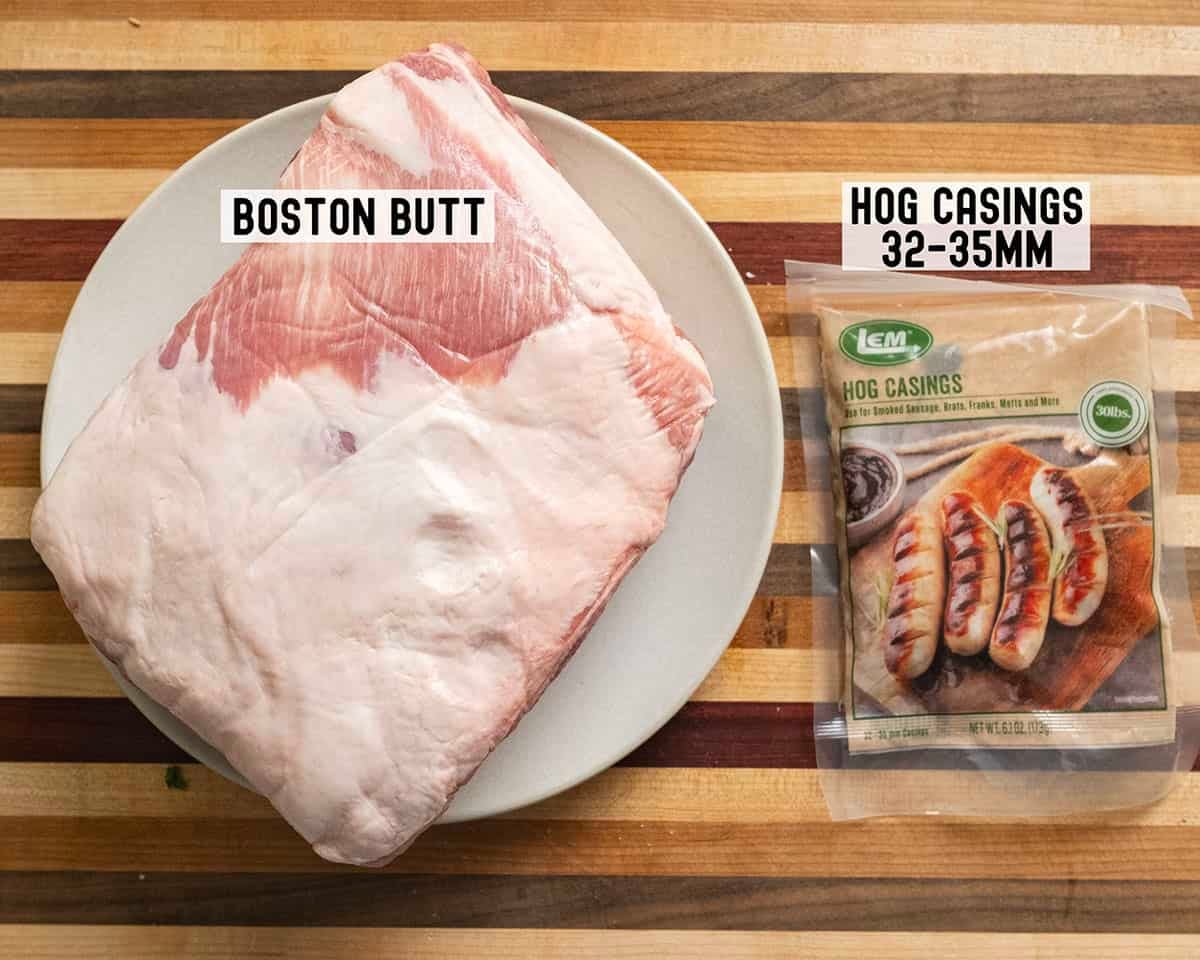
In general, for sausage, we're making it with pork. Even if you're making chicken sausage, it would be best to make it with some pork fat. Fat is tied for the #1 most important part of the sausage with salt. For most sausages, we want to use a Boston butt. It should have a good amount of hard fat in it. You could just go ahead and get a Boston butt and hope for the best, but you really want to have 75% lean meat and 25% fat.
The best way to guarantee the right amount is just to ask your butcher. I've taken Boston butts and picnic shoulders home and cut them up myself and got close to the right amount of fat, but your butcher would be happy to provide you with the right amount of pork and fat, especially if you tell them what you're doing and give them enough time.
The Fat
The fat should be the hard fat, not the greasy loose fat. You're going to get a bit of both, but it's so much easier to feed the hard fat through the grinder instead of the wet, loose fat. The harder the fat, the less chance it will smear as the temperature of it rises.
Chicken Sausage
Even with chicken sausage, you need a high-fat ratio of 75% lean and 25% fat. With chicken, you could use duck fat instead of pork fat. I also recommend using chicken thighs, not breasts.
Grinding the Meat
The next step in the process is grinding the meat. The Kitchenaid tools come with two types of grinding pieces, one with bigger holes and one with smaller holes. You'll want to use the small holes when stuffing sheep casings and the bigger holes when stuffing hog casings.
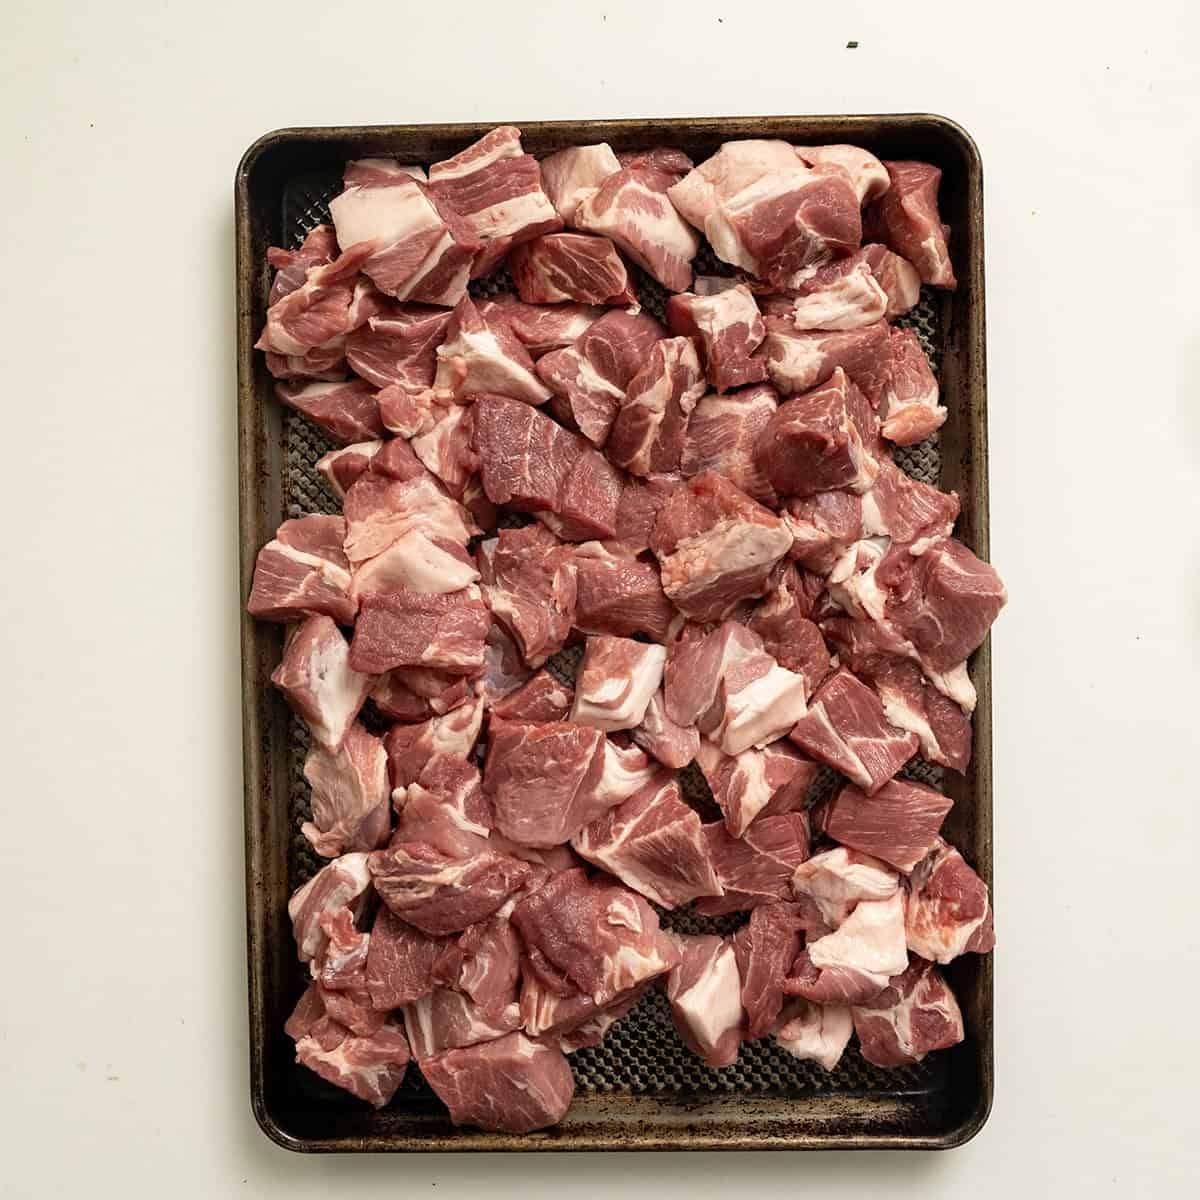
When you're about to grind the meat, prepare it by cutting it into pieces that will fit into the grinder (1-2 inch pieces). Spread all of the meat out on a metal baking sheet. Place the baking sheet, along with all of the parts to the grinder, in the freezer for 30 minutes. This will help firm up the meat and fat to keep anything from smearing. It will make the process a lot easier. You may need to do multiple trays in the freezer, depending on how much meat you have. I can usually fit 4-5 lbs on a tray.
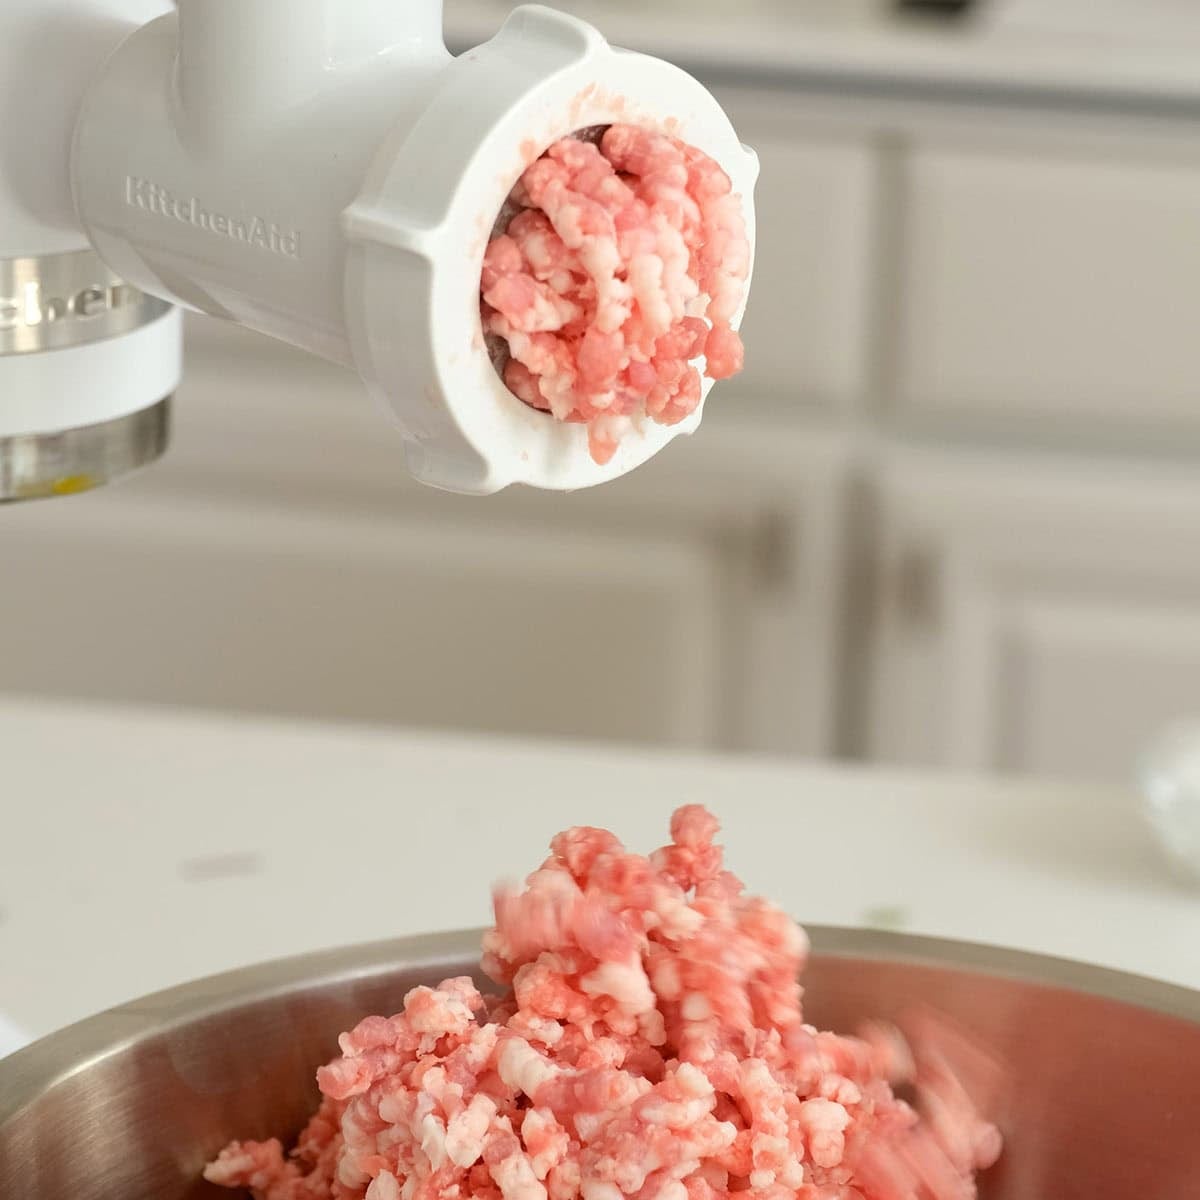
Remove from the freezer and set up your grinder. I usually grind at a speed of 6-8 on the KitchenAid mixer. Place a bowl underneath the grinder and start grinding the meat. Place the meat through the grinder and let the machine do the work. Use the tool they give you to help guide the meat through.
If you do see any smearing of fat, it would be a good time to stop, take a break, and place everything back in the freezer for a few minutes, and then restart when everything is cold. If you have a lot of the right fat, this shouldn't be an issue.
Seasoning and Salt
Salt content is so important to sausage. The salt content needs to be between 1-2% of the total weight of the pork. This will ensure that the meat sticks together in the shape of a sausage and is juicy and moist. Not enough salt and it will dry out and become crumbly.

Seasoning is subjective. I have the recipes that I use, whether it be for Hot Italian sausage, sweet Italian sausage, feta spinach and chicken sausage, or Italian chevalatta. But the fun part about homemade Italian sausage is the seasoning. You get to make it what you want. Check out our recipes below and use our seasonings, or use them as a guide!
Once you choose your seasoning, add it to the ground pork and mix until it is completely incorporated. Wrap it and place it in the fridge overnight. Let the salt and the seasoning permeate the meat so you get even flavor throughout.
Preparing the casings and the machine
Remove your casing from the salt and place it in a bowl of cold water. Wrap it and place it in the fridge overnight.

Remove the casings in the morning and place them in a bowl of warm water for 1 hour. Rinse them thoroughly inside and out. Let the water run through the casing to clear it out. Then drizzle the casings with olive oil.
Set up your sausage stuffing attachment, using the appropriate size. Grease the tube with olive oil and then slowly thread the casing onto the tube. Once you get the entire casing on, leave about 2-3 inches hanging off the end. Don't tie your knot just yet.
Stuffing the Sausage
Remove the sausage from the fridge and start placing some into the hole in the Kitchenaid mixer. Start the machine slowly at a speed of 4 until you see the meat reach the end of the tube coming towards your casing, then turn it off. Now, tie the knot in the casing so less air enters the casing.

If you tie the casing right away, you pump so much air through the machine and end up having to pop a hole in the casing.
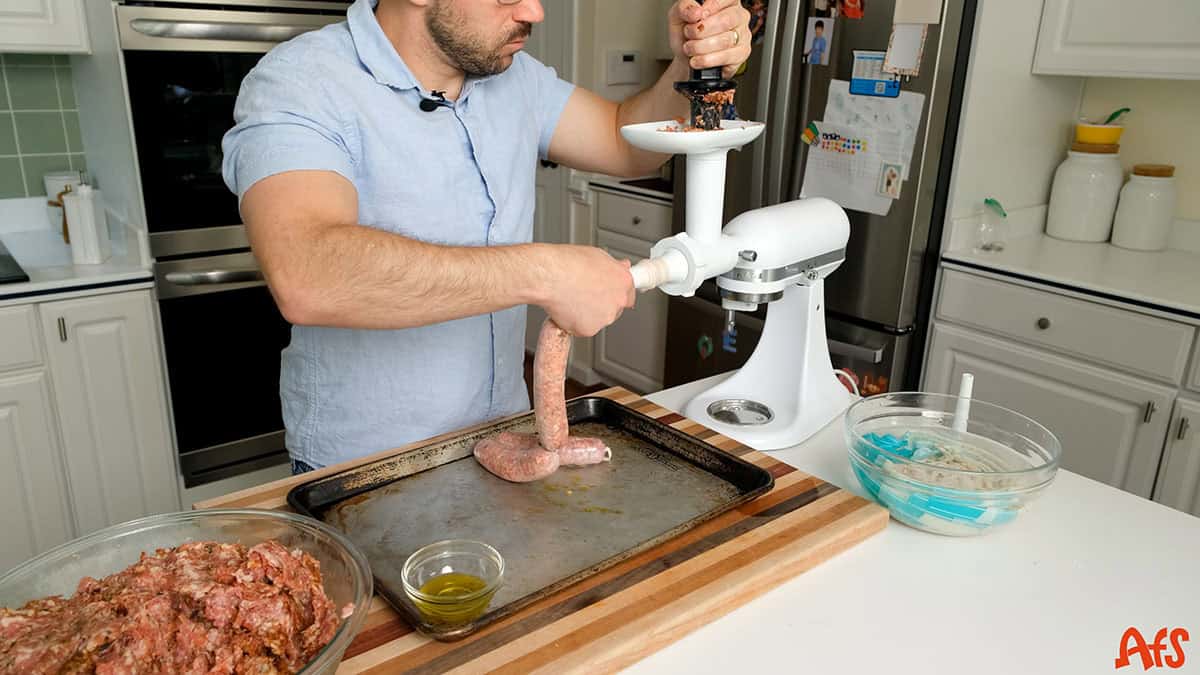
Once you have your knot, start the machine back up at a speed of 6-8. Allow the pork to fill the casing as you slowly pull it back towards yourself. If I'm making link sausage, I always spin the links as I go. I usually give four turns to each link, then keep stuffing. You want to work fast when spinning the sausage. Place your thumb and forefinger where you want to spin, press tightly, and turn. Making the links as you go makes sure you have enough casing and don't overstuff the sausage. It also makes it easier to get the same size links.
Once you get near the end of the casing, stop the machine and tie off the end of the casing. If you don't have enough room, you can always squeeze out some extra sausage to make room.

When you have all of the sausage stuffed, place it on a tray and rest in the fridge overnight. Letting the sausage take its form overnight will make it less likely to burst while cooking.
What to Make with Homemade Italian Sausage

There are so many ways to use this sausage. Whether it be grilled sausage, Sausage and Peppers, Sunday Sauce, Chicken Scarpariello, or sandwiches, that's why I always make so much of it. I can store it in the freezer for later use!
Serve it alongside summer side dishes like Italian Pasta Salad or Grilled Zucchini alla Scapece, or with hearty savory dishes like Creamy Red Pepper Sauce and Classic Italian Fried Meatballs.
You can use it as the main ingredient in recipes like Italian Sausage Bread and Rice Dressing with Sausage.
FAQs about Homemade Italian Sausage
Yes! You can freeze homemade Italian sausage for 3-6 months. I always make a ton and then freeze them.
1-2 teaspoon of kosher salt is perfect for 1 lb of ground pork. It's 5-9 grams of salt.
Yes, you can just make ground sausage. But it won't be in the shape of a sausage casing.
If I'm grinding regular Italian sausage, then I just grind once. If I'm using smaller casings for chevalatta, I'll grind twice, the second time, using a smaller diameter grind.
Recipes to Use Homemade Sausage


Please leave a comment and star rating below in the recipe card! I love to hear what you think of our recipes. Feel free to tag us on Instagram @vindelgiudice.
Save this Recipe So You Don't Forget it

Homemade Italian Sausage (Hot and Sweet)
Equipment
- 1 KitchenAid mixer
- 1 kitchen aid grinding attachment
- 1 Kitchen aid sausage stuffing attachment
- 2 large bowls
Ingredients
- 8 oz hog casings
Sweet Italian Sausage
- 6 lbs pork butt (boston butt) 75% lean 25% fat
- 2.5 tablespoon salt
- 2 tablespoon sugar
- 2 tbs fennel seeds
- 1.25 teaspoon black pepper
- 7 cloves garlic, minced
- ½ teaspoon nutmeg
- 1.5 teaspoon oregano
- ½ cup fresh parsley, chopped
- ¼ cup olive oil
Hot Italian Sausage
- 6 lbs pork butt (boston butt) 75% lean 25% fat
- 2.5 tablespoon salt
- 3 cloves garlic, minced
- 1 tablespoon black pepper +1tsp
- 3 tablespoon paprika
- 1 tablespoon anise, ground
- 1 tablespoon fennel
- 2 tablespoon crushed red pepper
- 1 teaspoon cayenne pepper
Instructions
Day 1
- Place all of your grinding attachment pieces in the freezer one hour prior to setting up. Remove the bone from your boston butt and chop it into 1-2 inch pieces. Place all of the boston butt on a baking tray. Place in the freezer for 20 minutes.
- Set up your grinding attachments. Then remove the meat from the freezer. Using the larger diameter grinder, grind your pork butt through the machine and into a bowl. Keep an eye on the grinder, and if the fat starts getting caught, pause and reset. If using a KitchenAid mixer, I usually grind on a 7 setting.
- Once all of the meat is in a bowl, combine your 6lbs of meat with the seasoning for hot or sweet Italian sausage (shown above). Mix really well. Wrap with plastic wrap and place in the fridge overnight.
- Place the hog casings in a bowl of cold water. Wrap and place in the fridge.
Day 2
- Set up the sausage stuffing system. If using the KitchenAid attachments, use the larger of the two cylinders. This works best for hog casings. Remove the casings from the fridge. Place the bowl in the sink. Run water through the casings to remove as much salt as possible. Then place the casings in a bowl of warm water for 30 minutes.
- Remove the casing you're going to start with from the warm water. Drizzle it with olive oil. Thread the casing onto the sausage stuffing attachment. Do not tie it off.
- Remove the sausage from the refrigerator. Run the meat through the machine until it gets to the very tip of the sausage stuffing attachment. Turn the machine off. Tie a knot in the casing, leaving no air in the casing.
- Run the sausage into the casing. Once you stuff the casing with 4-5 inches of meat, twist the casing, and continue stuffing the next sausage.
- Once all the sausage is stuffed, tie a knot, then refrigerate overnight before cooking. Either cook the sausage within 2 days or place it in the freezer for up to 6 months.
Video
Notes
- Placing the 1-inch pieces of meat in the freezer before grinding, will make them easier to grind and less likely to block up the machine.
- If the machine gets clogged up, it could be that the machine is warming up the meat, and the fat may start to melt and get stuck around the grinder. If this happens often, try to keep the meat in the freezer while you're grinding.
- When combining the ground meat with the seasoning, don't overmix. Try not to squeeze the meat because the more you do, the tougher the sausage will be.
- When twisting off the sausage casings, it's okay if they become semi-untwisted while going through the whole casing. Once you tie off the complete sausage, you can retwist them all.
- Always place them in the fridge overnight before cooking. This will make them less likely to burst while cooking.
- Always brush the sausages with olive oil before cooking to prevent the casing from popping or sticking.


Vinny DelGiudice says
This our family's favorite Summer project! Try this out and see the difference between store-bought and homemade!
Claire Boise Morda says
So glad to have found this site. I was looking to make lacinato for a side dish and started reading on your site. I have wanted for a long time to make my own sausage but I'm lazy and have just not figured out how to do it. Your instructions are fine and I look forward now to overcoming my procrastination and worse and making my own. Wow! Thanks-your story hooked me!